Uniview Camera Guides, Uniview is a global provider of video surveillance products and solutions. Founded in 2011, the company is based in China and is recognized as one of the pioneers in IP (Internet Protocol) video surveillance. Uniview offers a wide range of security and surveillance equipment, including cameras, network video recorders (NVRs), video management software (VMS), and other related products.
Here are some key aspects of Uniview:
-
Product Range: Uniview’s portfolio includes IP cameras, PTZ (pan-tilt-zoom) cameras, NVRs, storage solutions, and accessories. They also offer thermal imaging cameras, panoramic cameras, and advanced AI-driven solutions for security and surveillance.
-
AI and Smart Technology: Uniview integrates artificial intelligence (AI) and machine learning into their products, offering features like facial recognition, vehicle detection, intrusion detection, and smart event management.
-
Global Reach: Although Uniview originated in China, it has expanded its business globally, serving industries such as retail, transportation, banking, government, and more. The company exports its products to over 140 countries and regions.
-
ONVIF Compliance: Uniview products are ONVIF compliant, which means they can integrate with other security products from different brands that follow the same open standard, promoting interoperability.
-
Eco-friendly and Reliable Design: Uniview emphasizes the design of its products to ensure they are energy-efficient and reliable for long-term use in various environmental conditions.
The company has positioned itself as a significant player in the security and surveillance sector, competing with other major brands like Hikvision and Dahua.
Uniview Camera Guides
Uniview Cameras & NVR Default IP Address
If you’re looking for the default IP address of a Uniview NVR or security camera, your search is over! We have listed all the information about Uniview’s IP address settings below.
Uniview Cameras Default IP Address
By default, Uniview IP cameras are set to a static IP address of 192.168.1.13, with a subnet mask of 255.255.255.0. They also have DHCP enabled, which allows them to be assigned an IP address from a DHCP server such as a router or managed switch.
NVR Default IP Address
For Uniview Network Video Recorders (NVR), they are set to a static IP address of 192.168.1.30, with a subnet mask of 255.255.255.0. These settings apply to the LAN port. For devices with multiple Network Interface Cards (NIC), the static IP will be 192.168.2.30 for NIC2, and 192.168.3.30 for NIC3, etc.
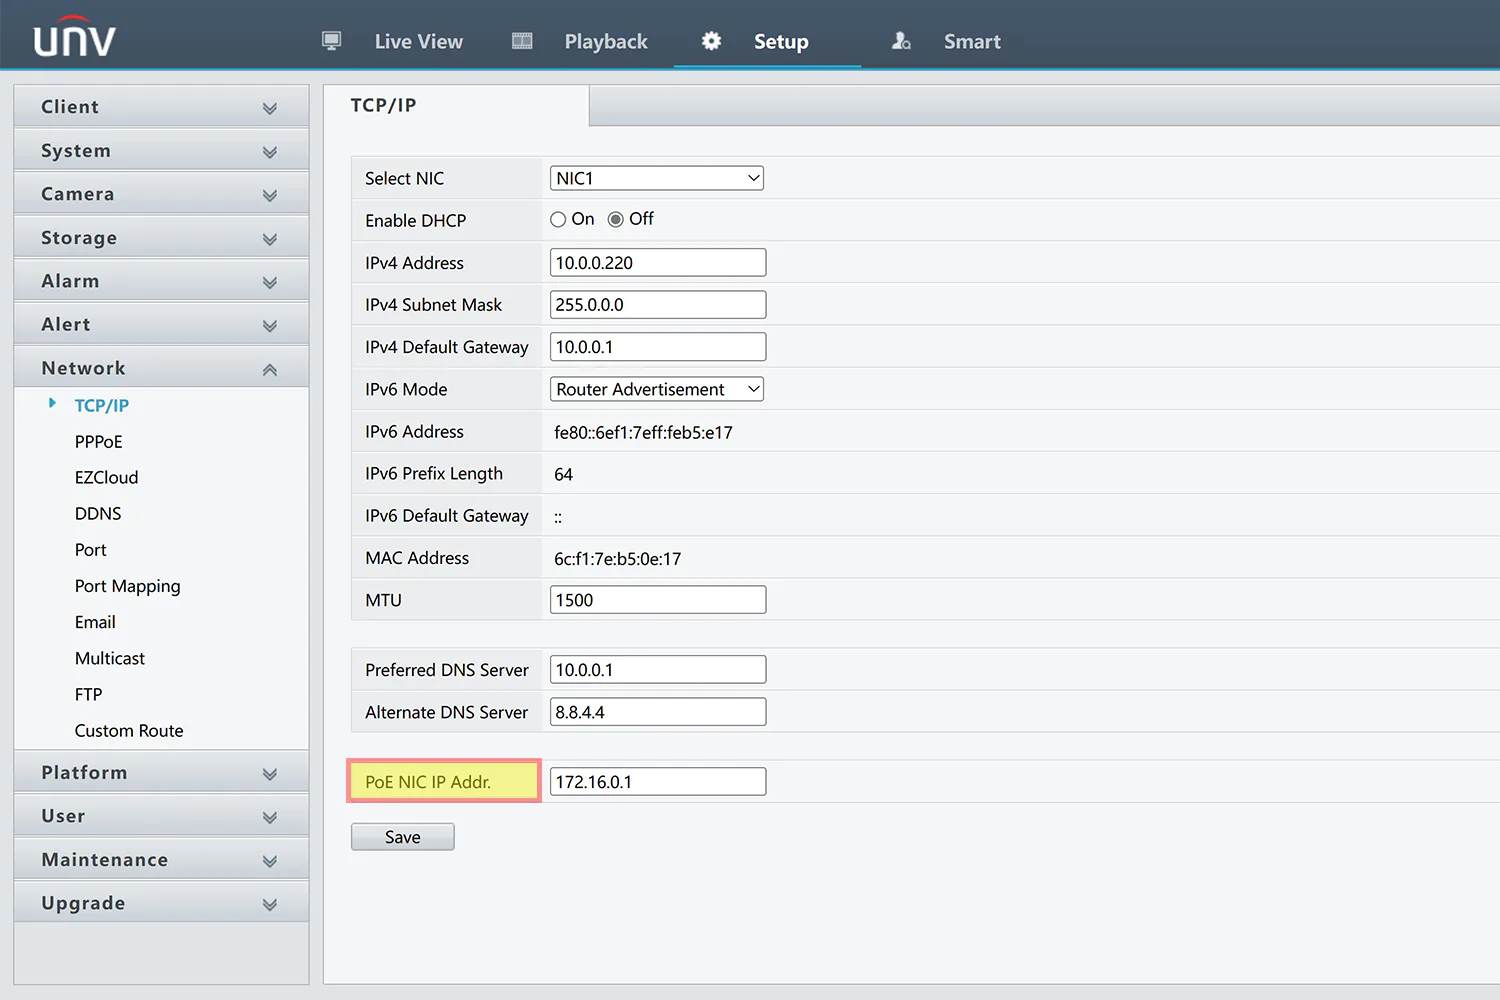
Also, for NVRs with PoE ports on the back, the default IP address for this interface is 172.16.0.1. Uniview NVRs have a DHCP server automatically enabled on the PoE NIC, which causes connected Uniview cameras to be set to an IP address of 172.16.0.X.
You can change the internal NIC address of a Uniview NVR under the Network -> TCP/IP -> PoE NIC IP Addr. settings menu.
How to Update Uniview Cameras Firmware
Importance of Firmware Upgrades
It’s important to keep your camera’s firmware upgraded to the latest version for a variety of reasons. Occasionally, vulnerabilities are discovered in the firmware which can be exploited by malicious users. For example, in 2021 Uniview published a security notice regarding a buffer overflow vulnerability, along with steps to mitigate it. Their recommendation was to update the affected devices to the latest firmware, which fixed the exploit.
Another reason for updating firmware is to enable new features which are added to the camera software. One example is the 5MP Active Deterrence PTZ, which gained the ability to perform auto-tracking after a new firmware was released in 2021. Leo Xu from Uniview said this about firmware upgrades: “We do a major update every quarter and a minor update every month. Every product has some differences.”
How to Perform a Firmware Upgrade – Via EZTools 2.0
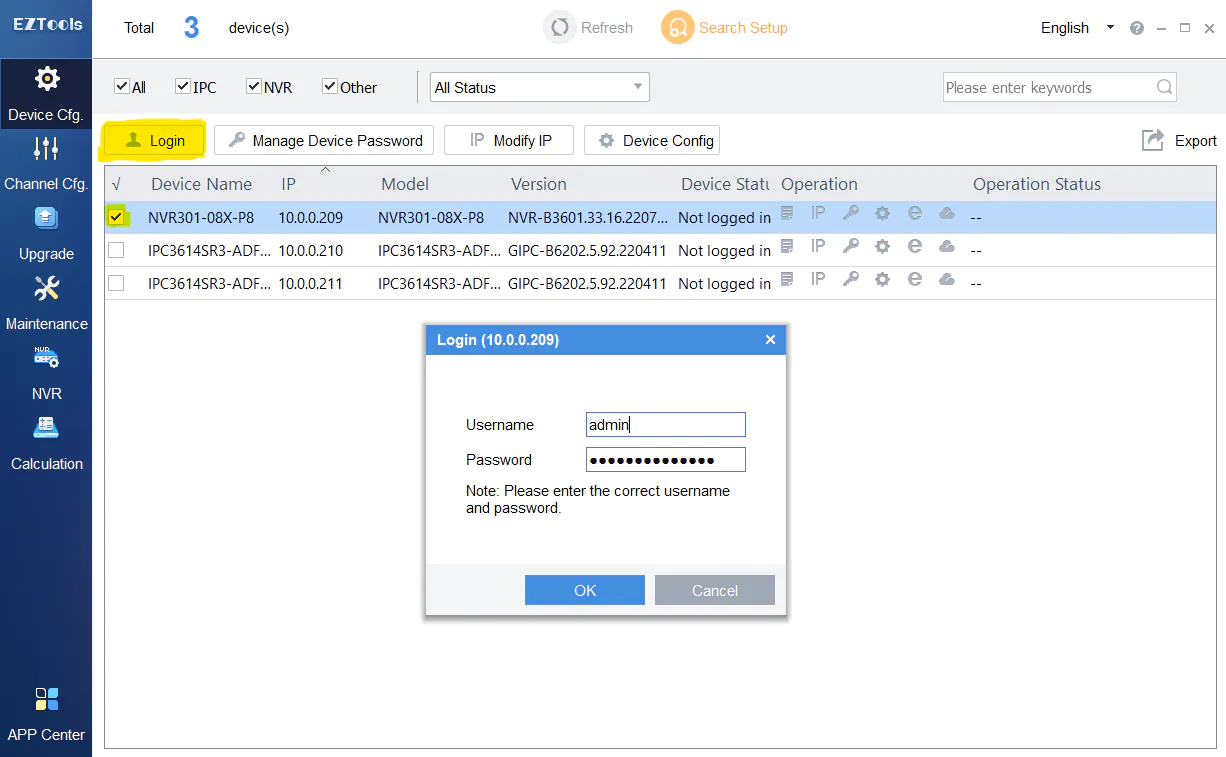
Now that you understand the importance of a firmware upgrades, you’ll want to know how it’s done. The easiest way to upgrade your camera’s firmware is via EZTools 2.0; Uniview’s robust camera configuration tool. You can download that from the support section of our website –
After installing EZTools 2.0, open the software and follow the steps below to update your Uniview cameras’ firmware:
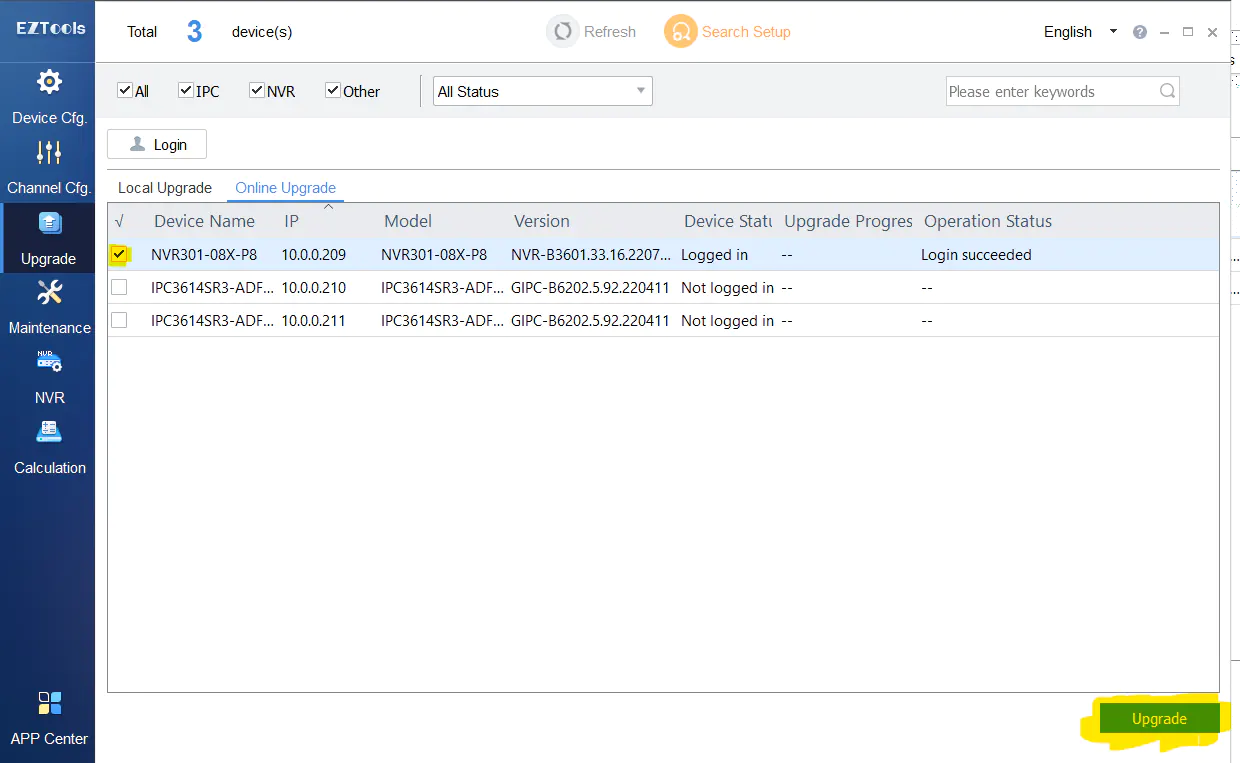

If you selected an NVR during steps 1 and 5, you will be able to upgrade all cameras added to the NVR during step 6. So, this method makes it very quick and easy to perform a firmware upgrade.
How to Perform a Firmware Upgrade – Via Web Interface
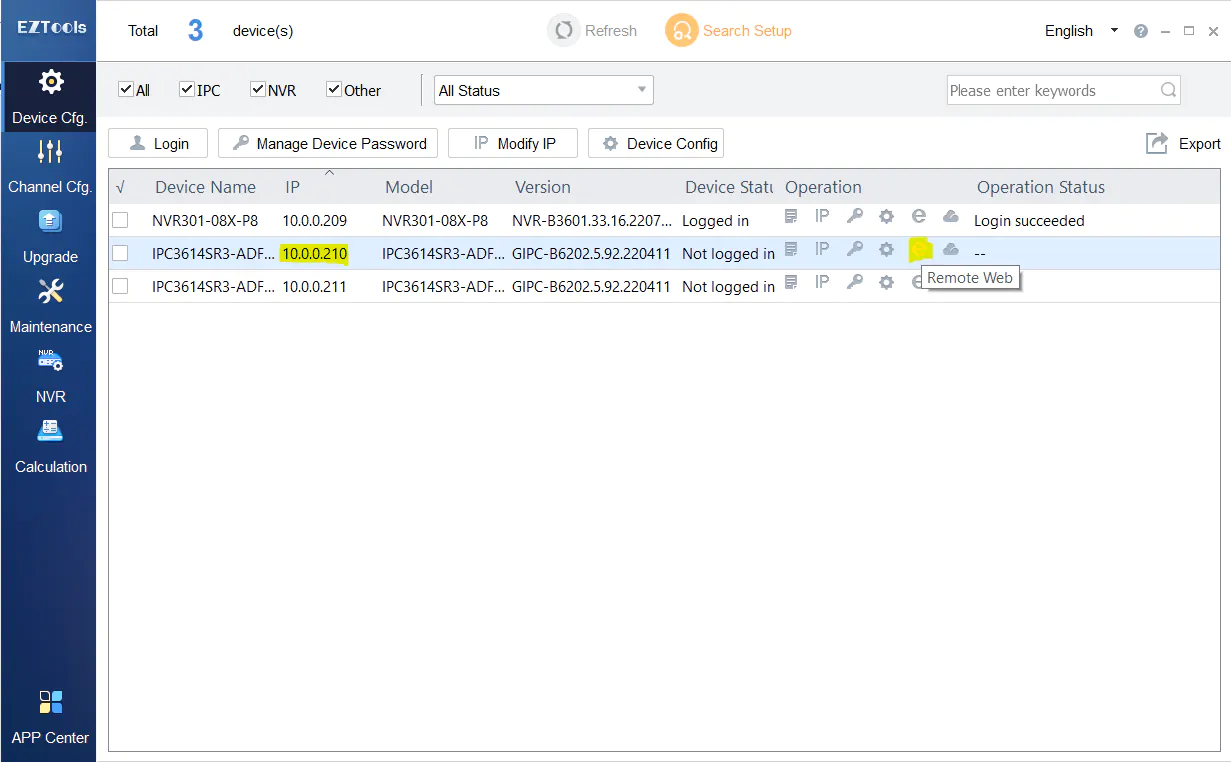
Another way to perform a firmware upgrade is via the web interface of the camera. To access the web interface of the camera, use EZTools 2.0 to find the local IP of the camera and enter it in your web browser. Or, you can click the “Remote Web” icon to automatically open the camera in your default browser.
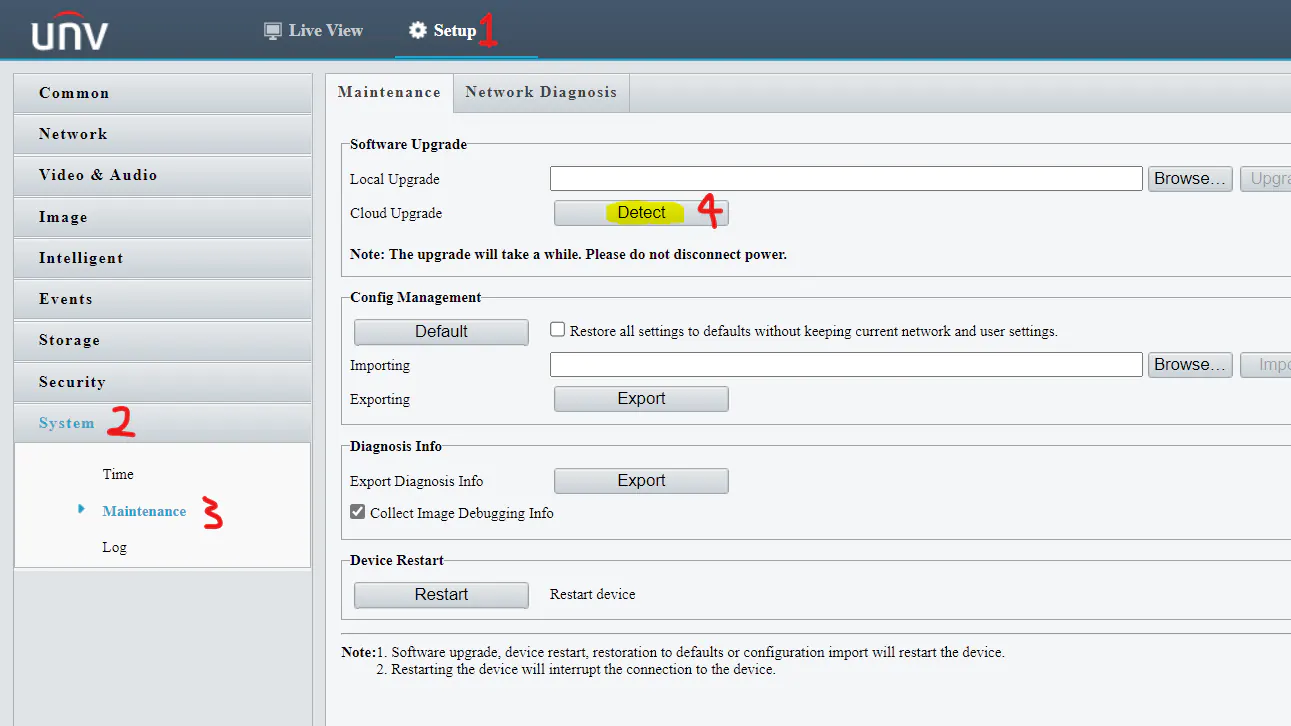
Login to your camera via the web interface; you may have to change the default password first. Once logged into the camera, navigate to Setup -> System -> Maintenance. You’ll see two options under Software Upgrade: “Local Upgrade” and “Cloud Upgrade”. If you already have the latest firmware package on your computer, choose “Local Upgrade” otherwise use the cloud upgrade function by clicking “Detect”. If a new firmware is available, the button will change to “Cloud Upgrade”; click it again to update the camera to the latest version.
How to Perform a Firmware Upgrade – Via NVR (using local monitor)
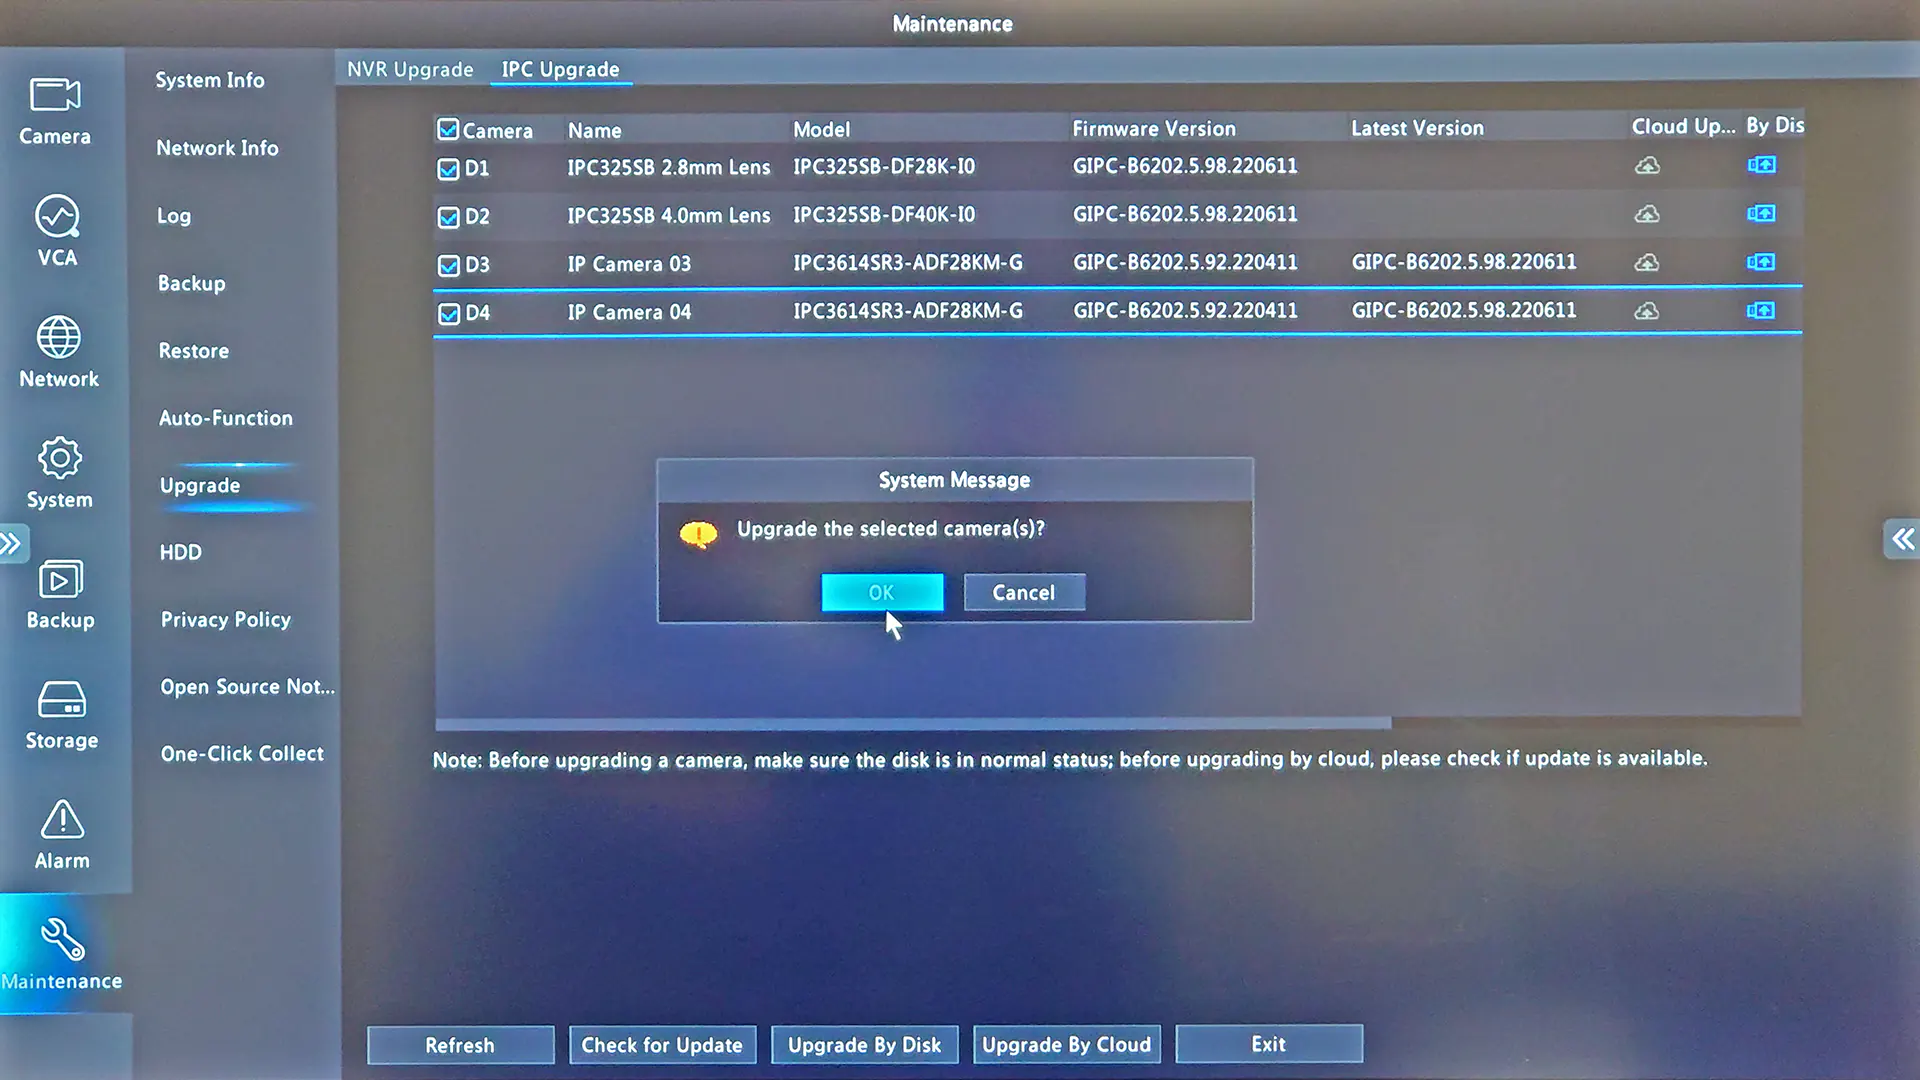
The previous two methods of upgrading your firmware require a laptop or desktop computer to complete. If you don’t have access to a computer, you can also upgrade the camera’s firmware through the NVR’s local interface. Of course, the NVR must be connected to a monitor via VGA or HDMI so you can see what’s happening.
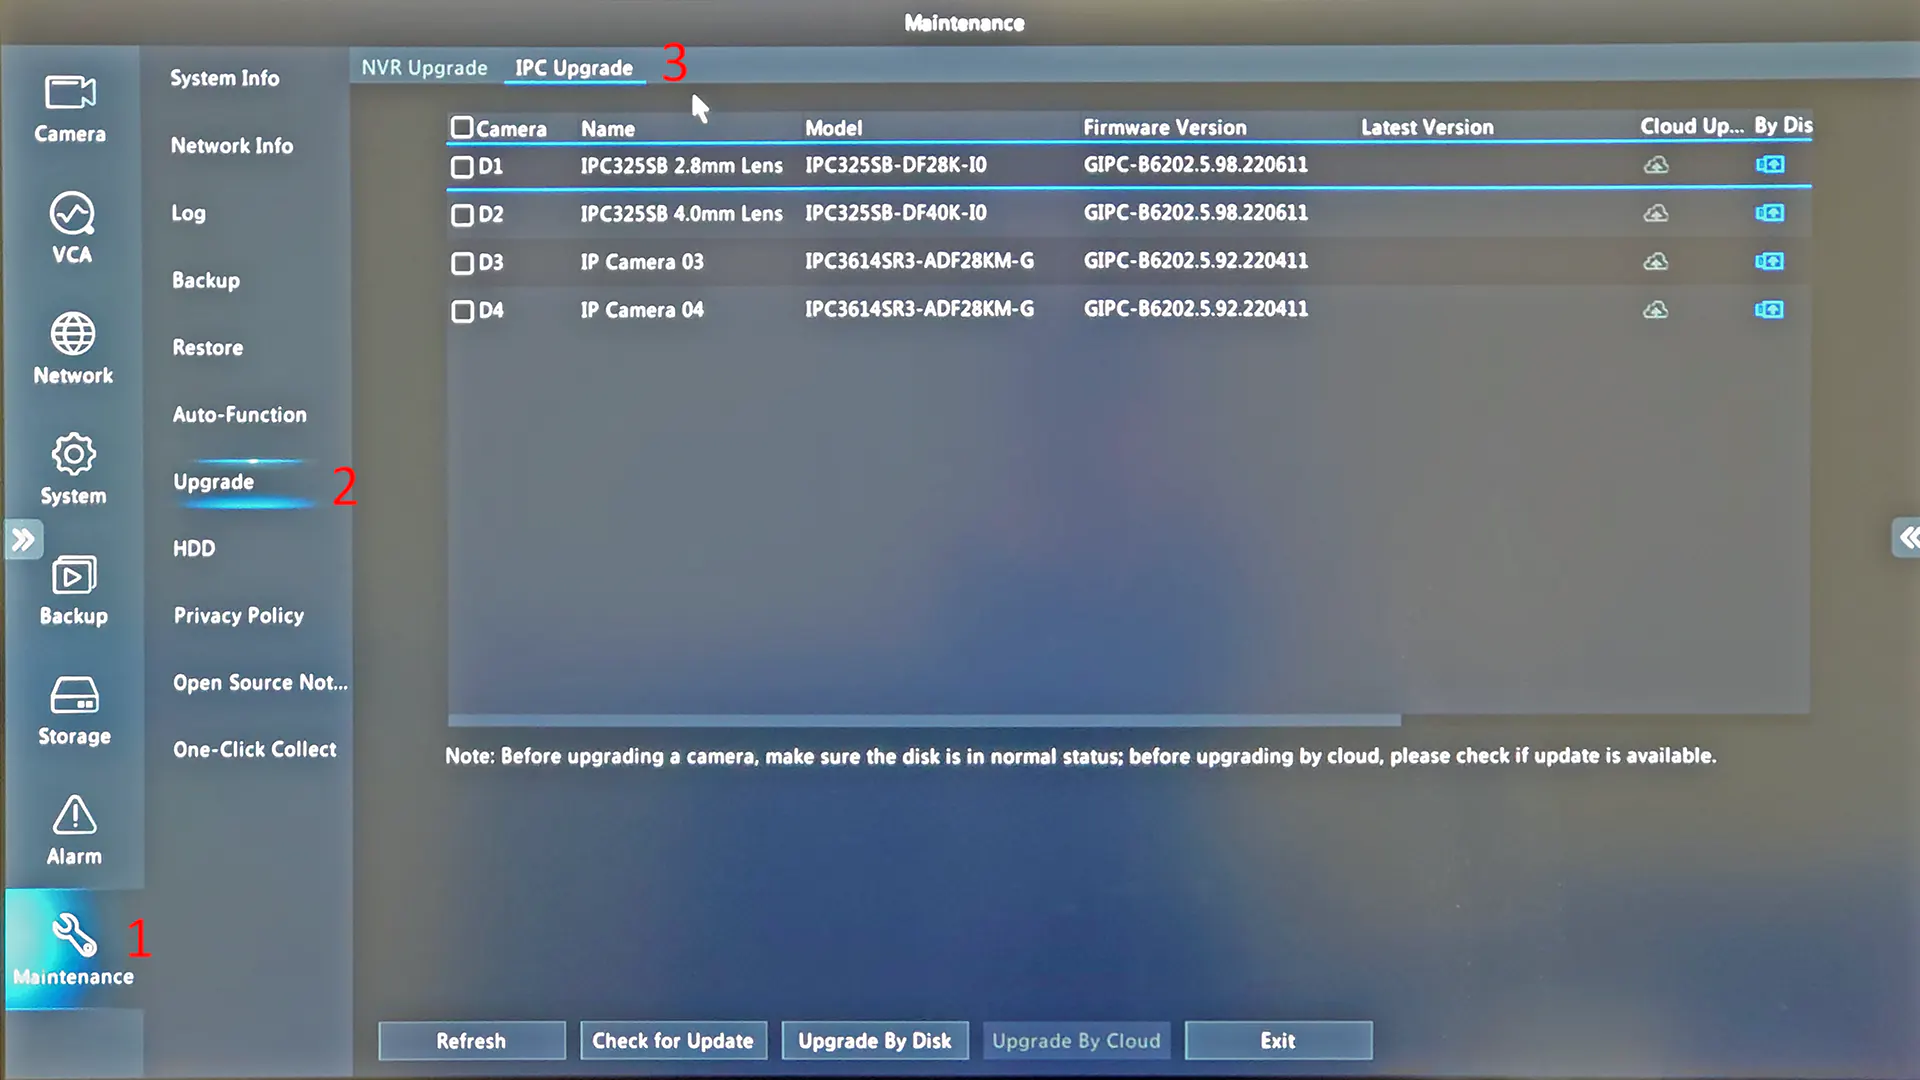
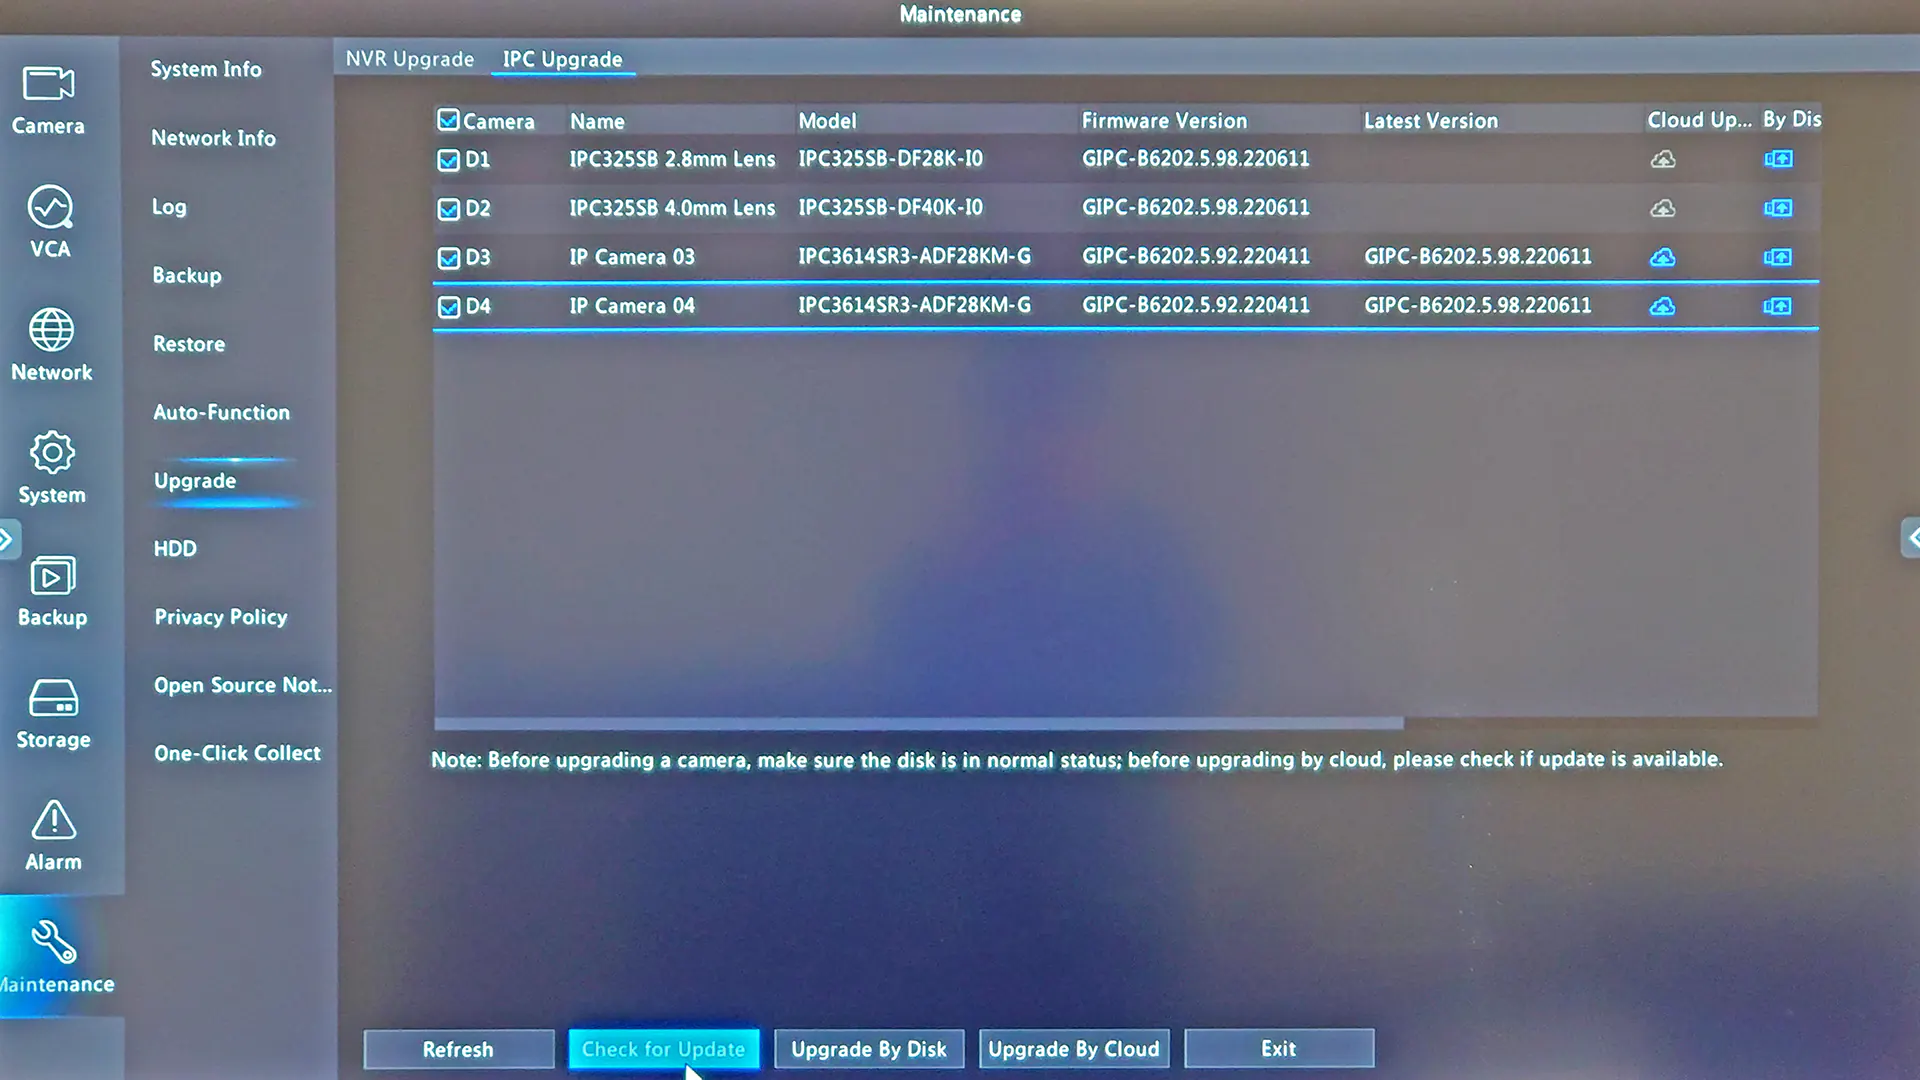
Using a USB mouse connected to the NVR, right-click to open the menu and select “Main Menu”. Navigate to Maintenance -> Upgrade -> IPC Upgrade for a list of all cameras added to the NVR. Click “Check for Update” at the bottom for the NVR to search Uniview’s servers for the latest firmware version for your cameras. Next, select the cameras you’d like to upgrade by checking the box on the left side. Finally, click “Upgrade by Cloud” and hit “OK” to upgrade the selected cameras firmware.
Conclusion
It’s important to regularly keep the firmware on your Uniview cameras updated to the latest version for security and performance reasons. The instructions in this guide also apply to Uniview NVRs, which also need to be upgraded for the same reasons. If you aren’t able to find the latest firmware via cloud upgrade, you can try emailing Uniview support: globalsupport@uniview.com. Occasionally they have access to newer, stable firmware which has not been released on the cloud yet. In addition, we plan on adding firmware downloads to our site in the near future.
Finding Uniview IP Cameras with Auto Search via Web Browser
In this tutorial, we will access the Auto Search button from the web interface of the NVR; using a laptop or desktop computer.
What is Uniview Auto Search?
Uniview’s Auto Search function is a useful way to discover all ONVIF devices connected to a Uniview NVR, including third-party cameras. Using this feature allows you to quickly find all security cameras on the networking, including Uniview and third-party IP cameras.
Using Auto Search to add an IP Camera
To start, you’ll need to login to your Uniview NVR using a computer. Type in the IP address of your Uniview NVR in your web browser and login. You can also use EZTools 2.0 to find the IP address of your NVR.
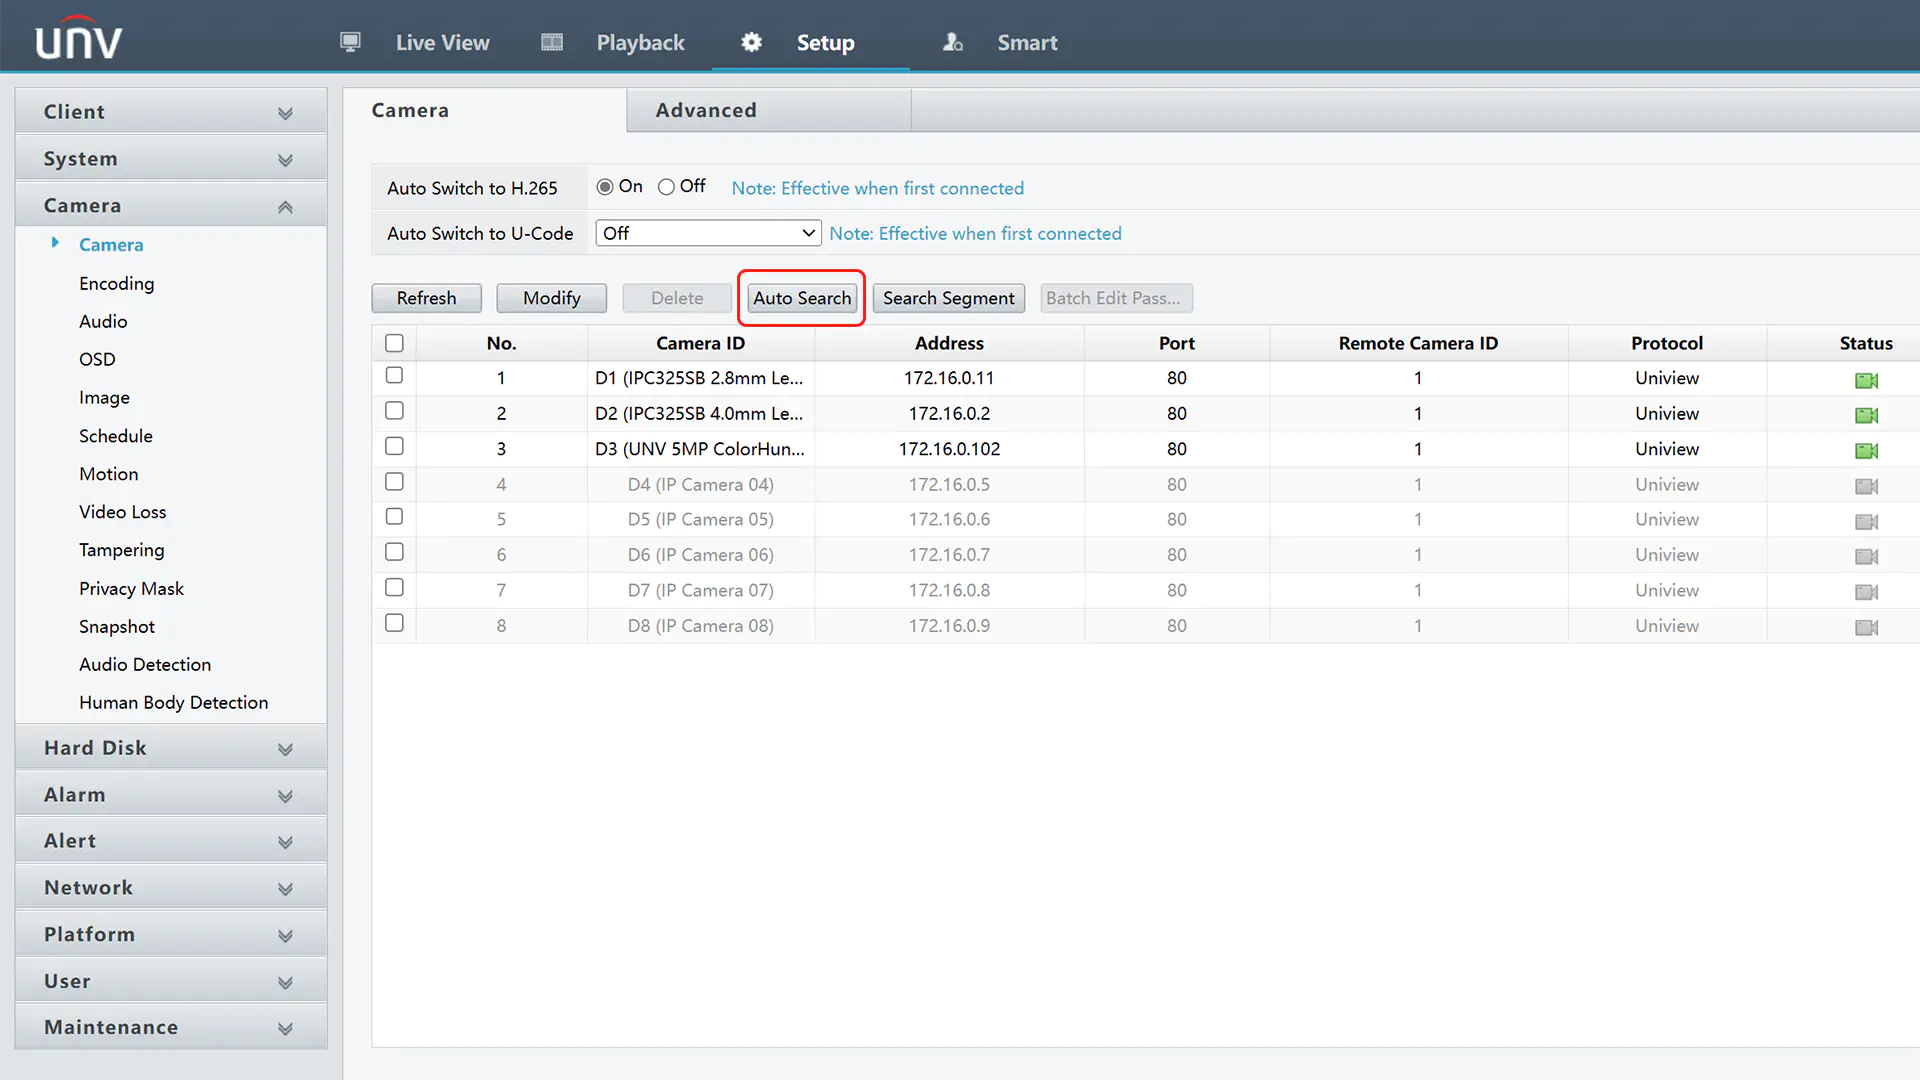
Next, navigate to Setup -> Camera -> Camera and click the “Auto Search” button.
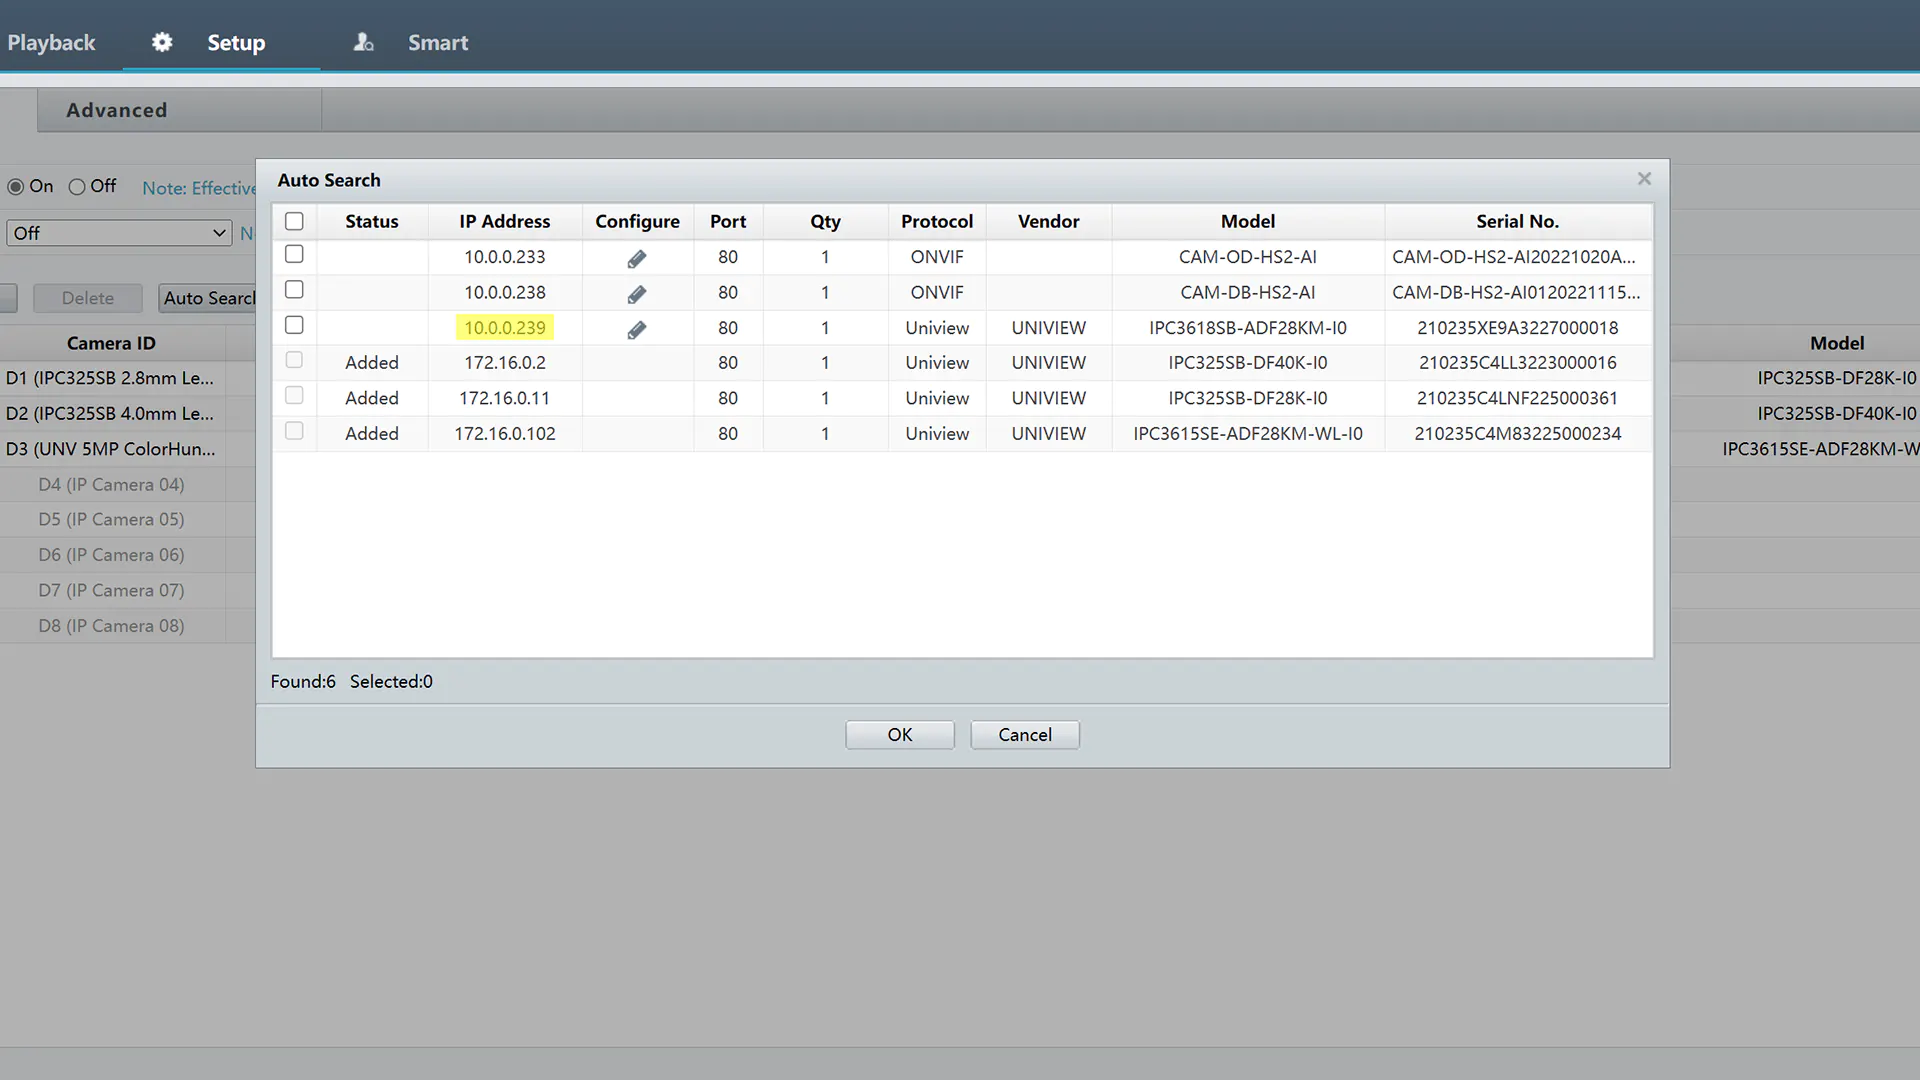
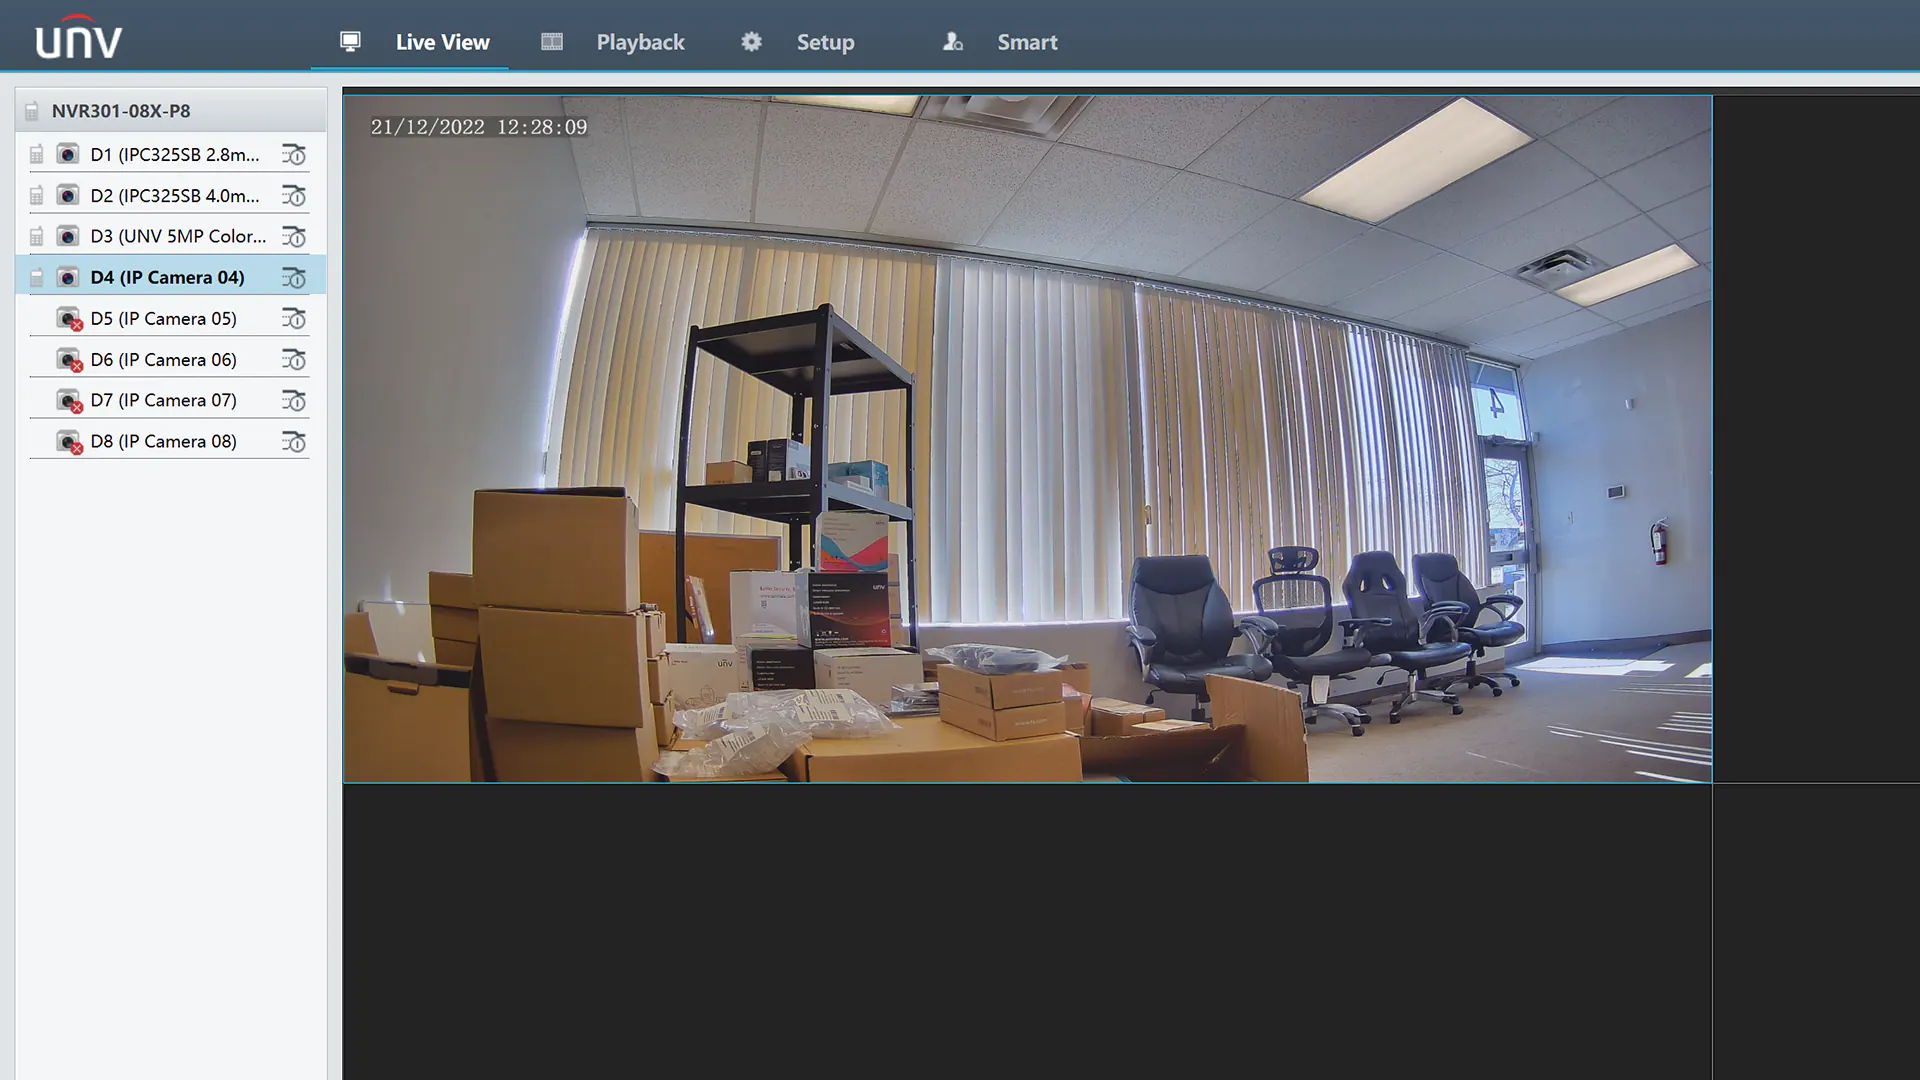
You will see a list of cameras available on your network; it will show devices plugged into the PoE ports on the back of the NVR, and cameras connected on your network via the LAN port of the NVR. If you don’t see any cameras, please check the physical connection to ensure the camera is receiving power and is communicating with the NVR.
![]() Make Note of the Camera’s IP Address
Make Note of the Camera’s IP Address
The Auto Search menu will show a list of the IP cameras on your network; it also shows important information such as the IP address, model number, and serial number of each device. Make a note of the un-added cameras IP address, you’ll need it in the next step.
Add the IP Camera by Modifying an Empty Channel
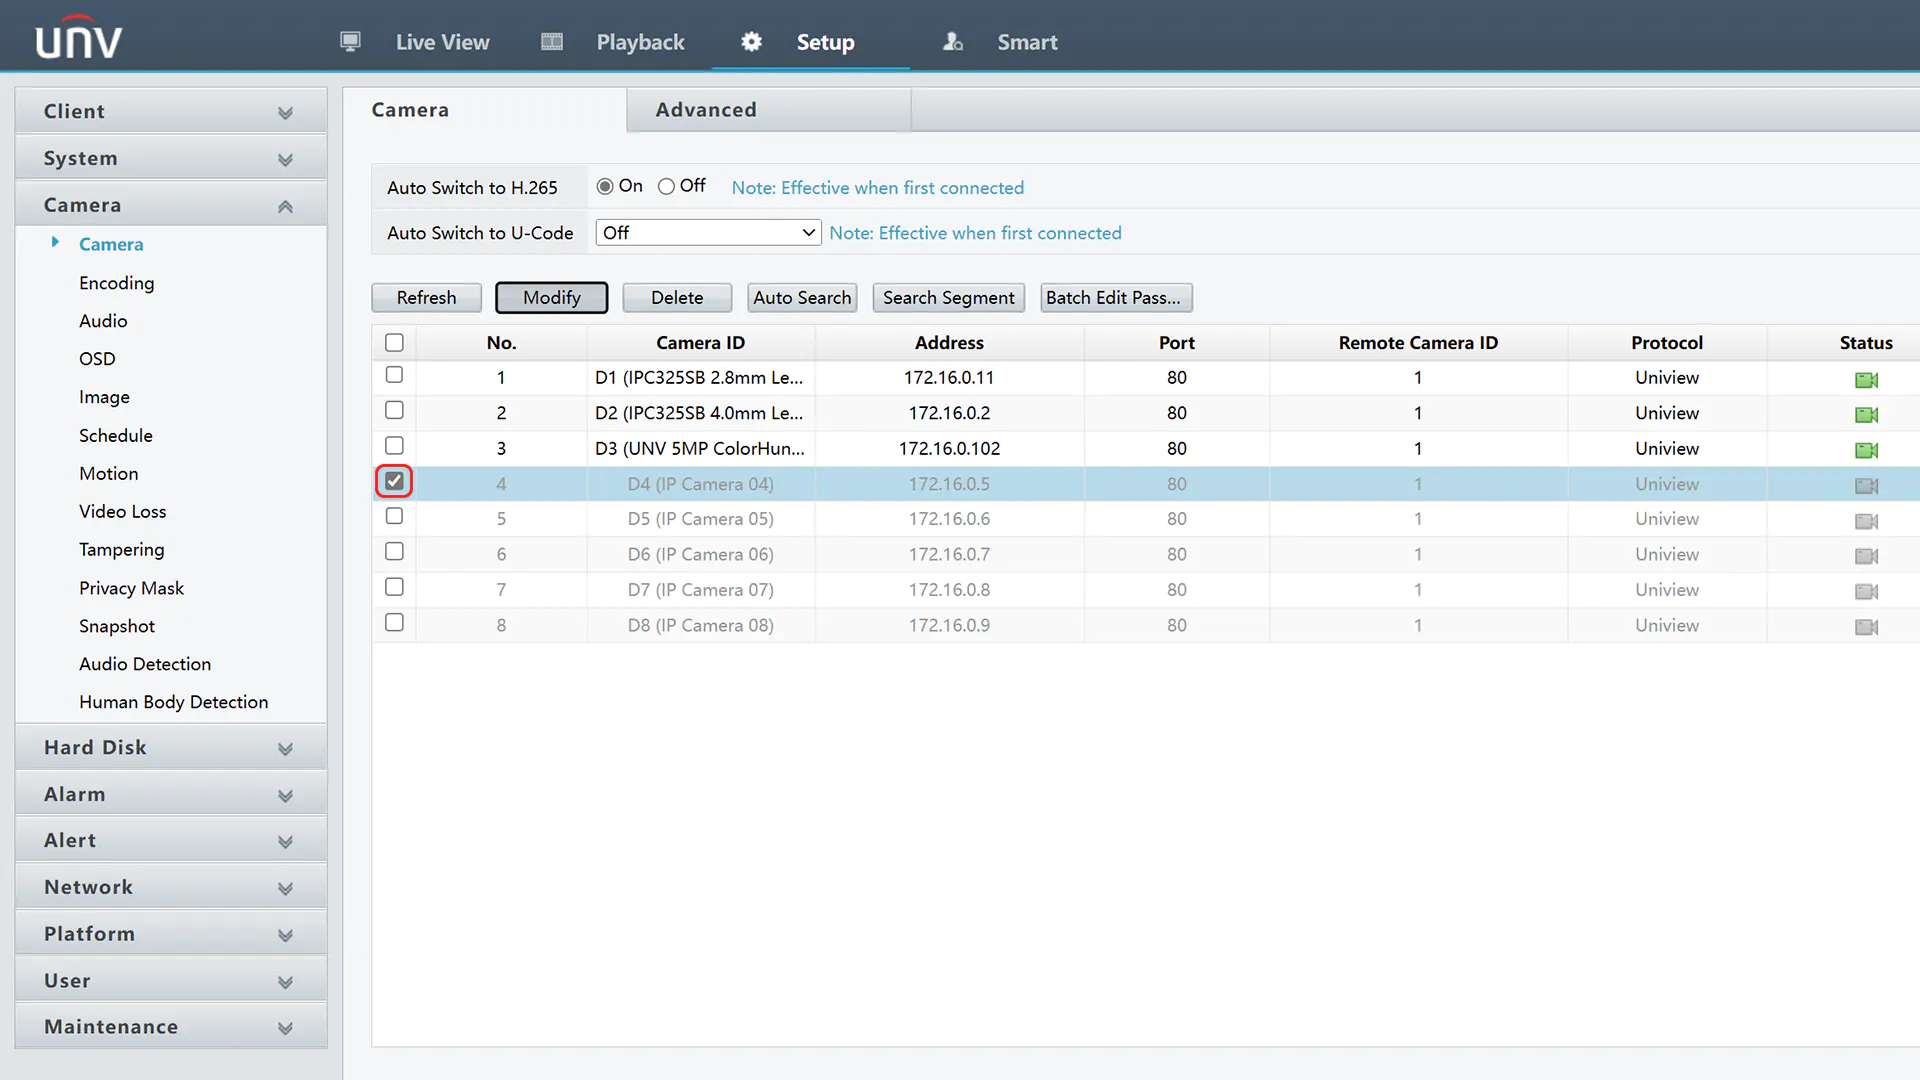
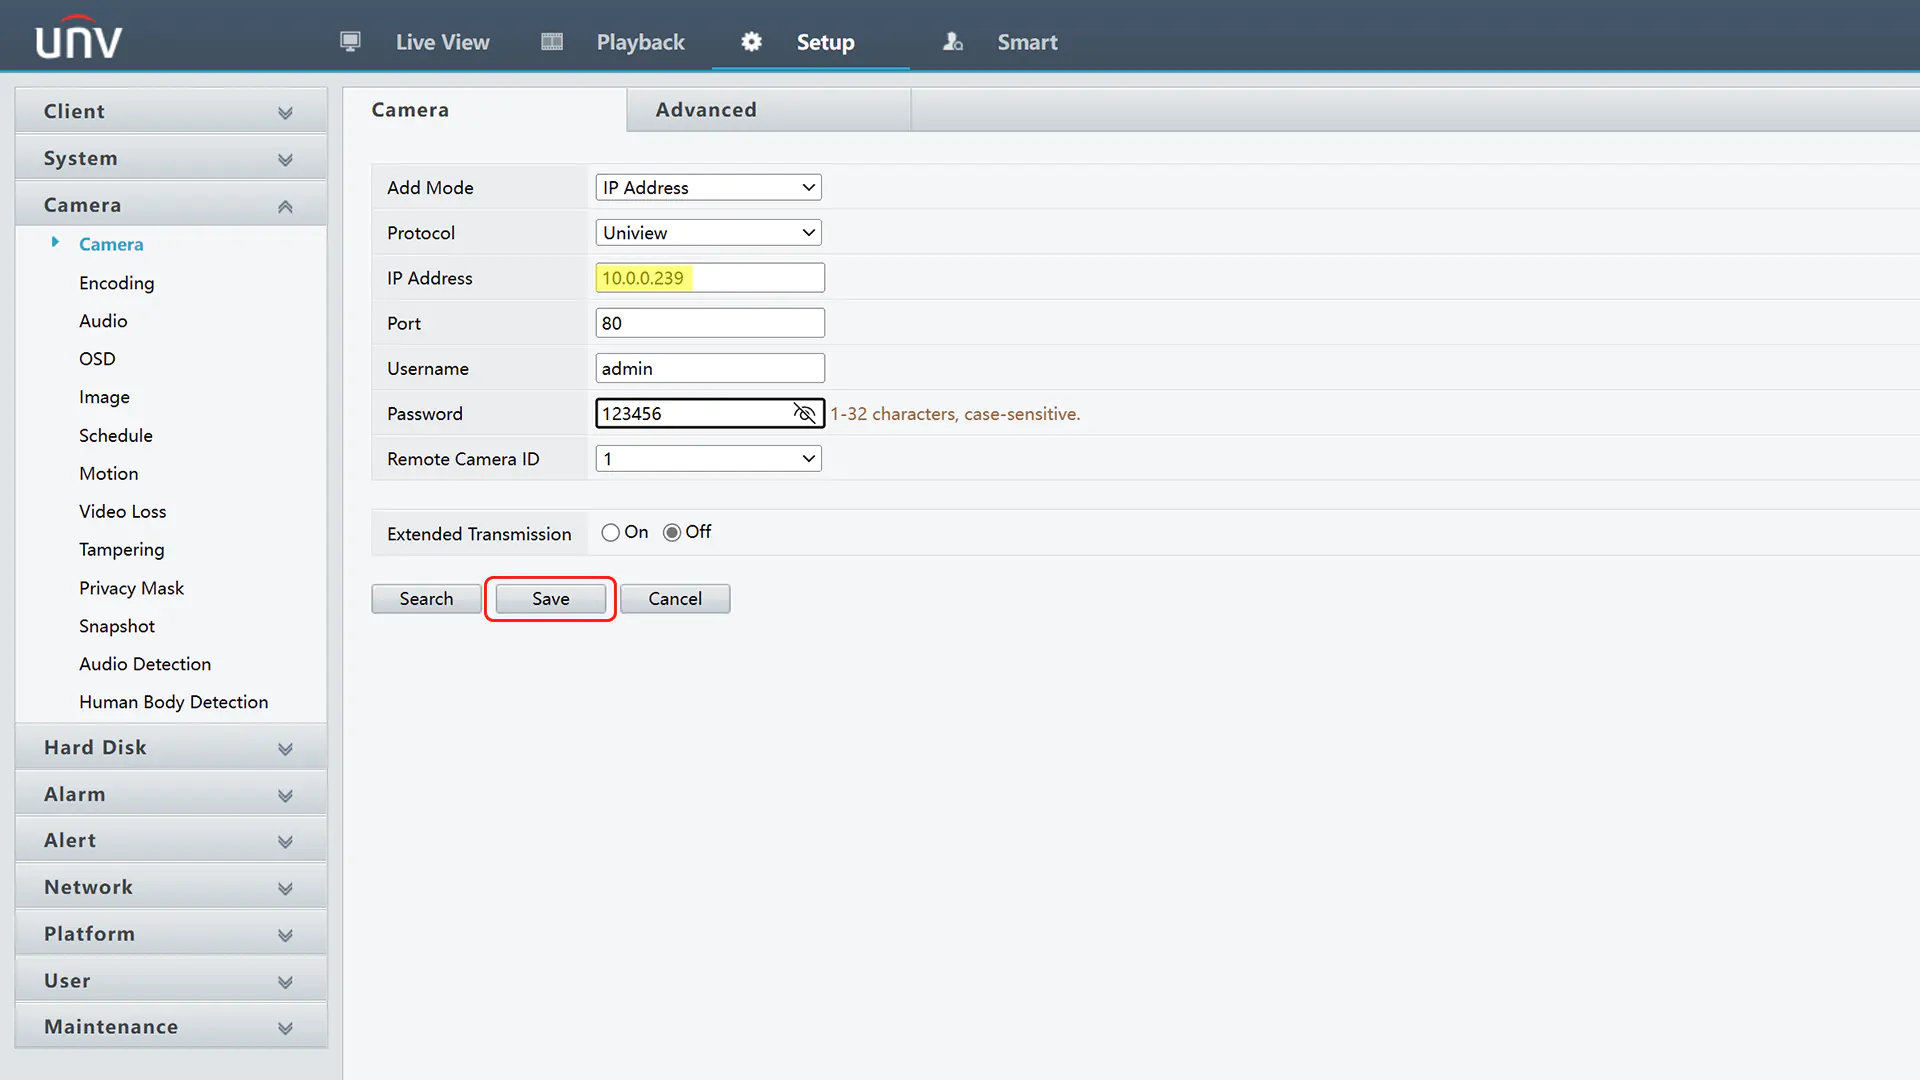
Next, we’ll use the Modify function on an empty channel to add the IP camera. Click on an empty channel so the arrow is checked, and click Modify.
Change the Add Mode from “Plug-and-Play” to “IP Address”, and type in the IP address of your camera, followed by the password. If you are using a third-party camera, change the Protocol to “ONVIF”, otherwise keep it set to “Uniview”. Click Save at the bottom to finish adding the camera.
Troubleshooting – Camera is Still Offline
If your camera is still offline, follow these steps to check what the issue could be:
Final Thoughts
Adding IP cameras to a Uniview NVR is made easier by using the Auto Search function. This function allows you to view all IP cameras connected to the network, and quickly add them via IP address. It also works for third-party cameras, as long as they support ONVIF.
Uniview’s Auto Search function can be accessed through the web interface, and a similar function can be accessed directly from the NVR while using a monitor. After learning how to use the Auto Search function, you will greatly reduce the time it takes to add third-party cameras onto the NVR.
How to enable steady light on Uniview ColorHunter cameras
Uniview’s ColorHunter cameras can be configured to have either a flashing light, or a steady light depending on your situation and requirements. This light is triggered via the “Intrusion” or “Cross Line” detection zones which can be setup through the NVR “Smart” menu.
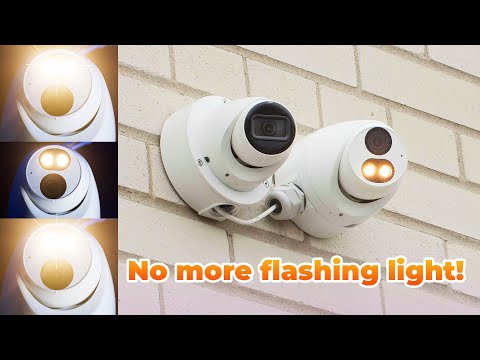
If you’d like to view this tutorial in a video format, you can watch the video below. Otherwise, keep scrolling for text and image-based instructions.
Prerequisite: Setup a Detection Zone on the NVR
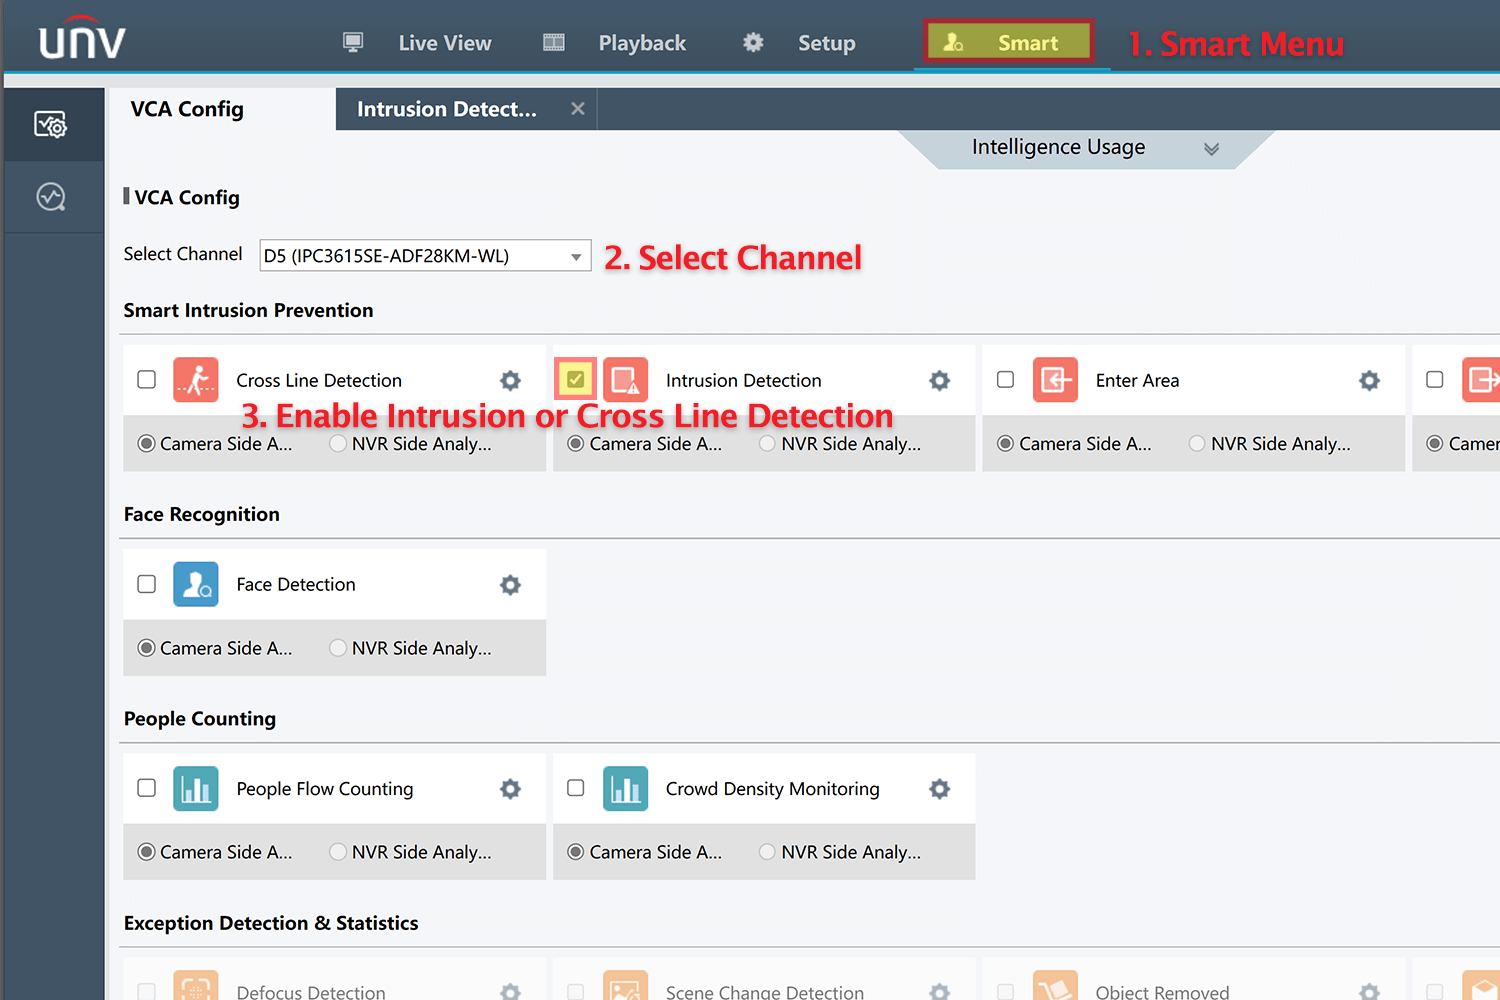
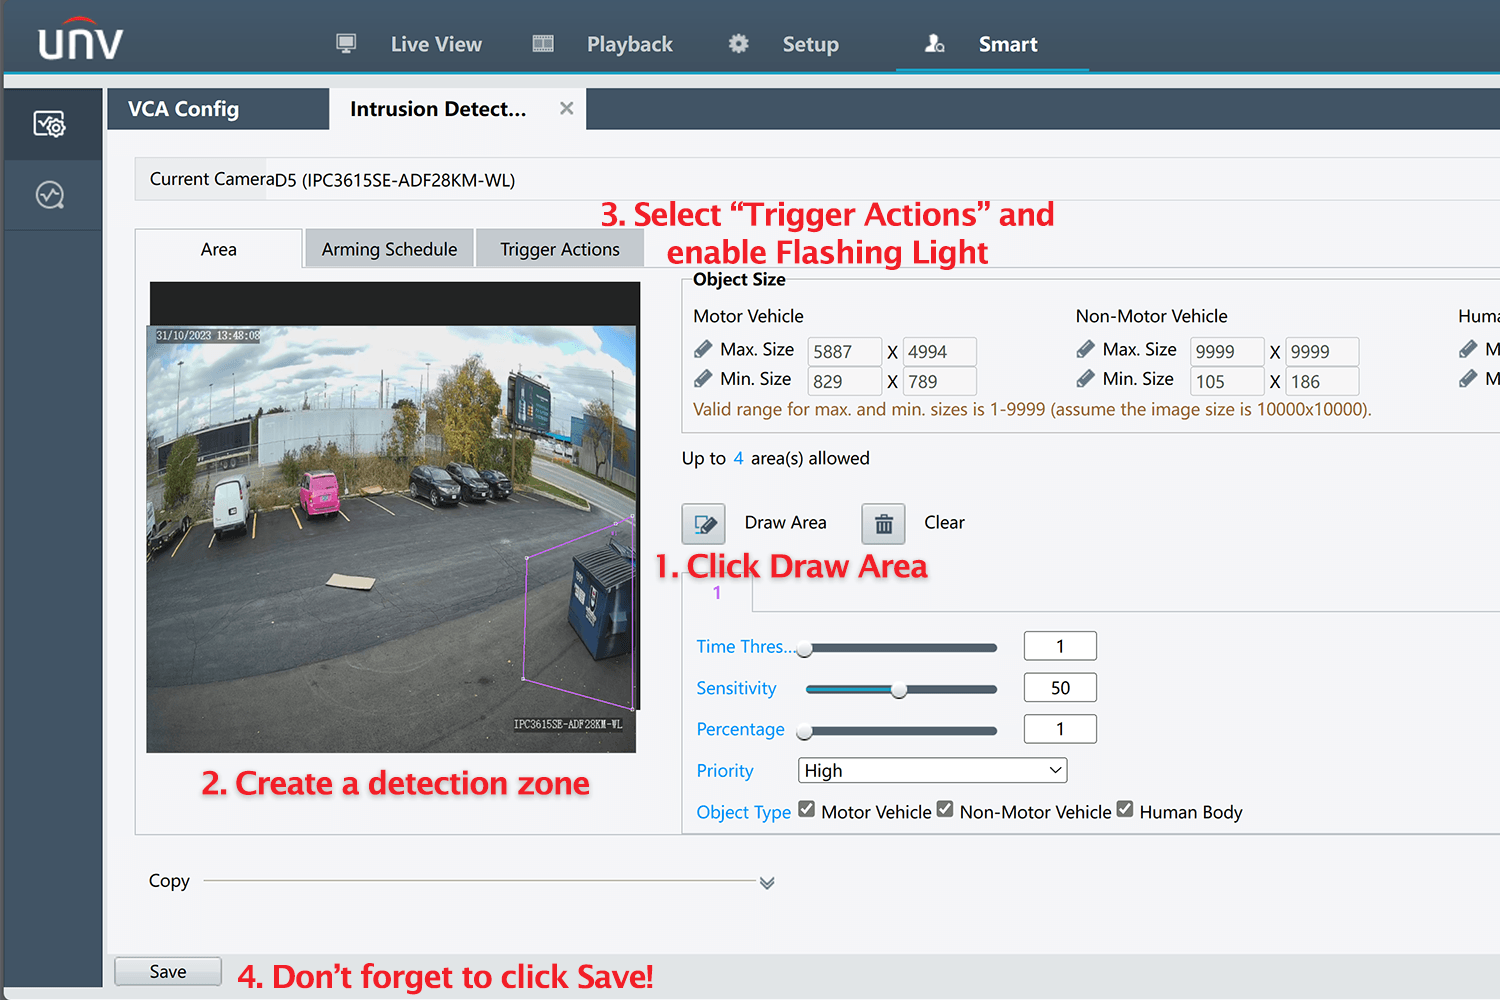
Before the white light can trigger, you will need to setup a detection area on the NVR. First, login to the NVR via the web browser and navigate to the Smart settings. Next, select your ColorHunter from the Select Channel dropdown menu, then check the box below to enable either “Intrusion” or “Cross Line” detection.
Once you’ve selected your detection method, click the Gear Icon to enter the settings for that detection method. Now, click on Draw Area and start drawing a detection zone over the camera image. Any person or vehicle enter this area will trigger the light on the ColorHunter camera.
Finally, navigate to the Trigger Actions tab and make sure Flashing Light is checked. Click the gear beside the flashing light setting to adjust the time the light will stay on; by default it’s set to remain on for 10 seconds.
Don’t forget to hit Save near the bottom left, otherwise your settings will not be saved!
Switch Between Flashing Light and Steady Light
Now that you’ve setup the detection zone from the Smart menu, the light will automatically flash when someone enters the area. This is the default behaviour, meant to deter people from loitering or trespassing into a restricted area.
If you’d rather have a light that turns on without flashing, you’ll need to configure a few more settings.
How to enable the steady (non-flashing) light
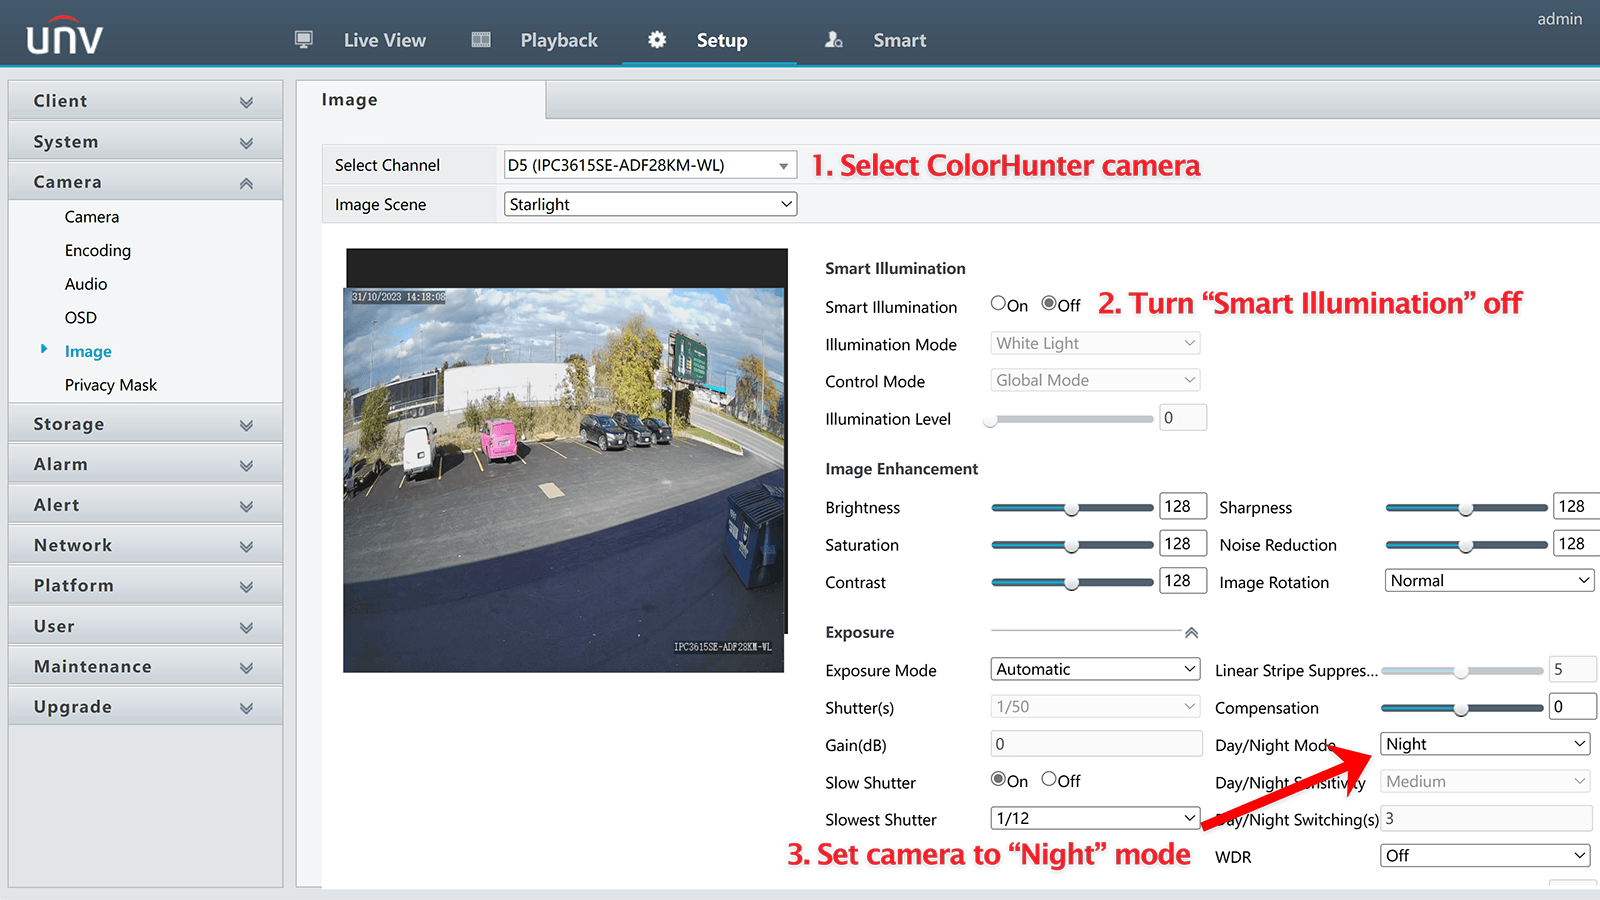
To enable a steady light, navigate to the Camera -> Image settings menu on the NVR. Select the camera from the Select Channel dropdown menu , and set Smart Illumination to Off. This will prevent the light from automatically turning on when the scene becomes dark.
Next, click the small arrow beside Exposure to reveal the options underneath. Set the Day/Night Mode to Night.
When the camera is set to Night mode and the light is triggered, it will turn on with a consistent brightness. In Day mode, it will trigger with the previous flashing behaviour we saw earlier. So, make sure the camera is set to Night mode if you want a non-flashing light.
Final Thoughts
By setting the ColorHunter camera to a steady light mode, you can utilize it similar to a motion-activated porch light. This does come with a downside; because the light is disabled until a person walks into the scene, you may not get full colour at night.
Ultimately, it depends on how much ambient light you have at your location. In a typical residential neighbourhood with street lights, the camera work fine. However, in rural areas you may want to keep Smart Illumination enabled otherwise the image quality may be degraded due to lack of light in the scene.
Uniview camera setup guide,
How to install Uniview security cameras,
Uniview IP camera user manual,
Uniview camera troubleshooting tips,
Uniview surveillance system installation,
Uniview camera configuration tutorial,
Best Uniview cameras for home security,
Uniview NVR setup instructions,
Uniview camera firmware update guide,
Uniview camera remote access setup,
Uniview PTZ camera setup guide,
How to configure Uniview AI detection,
Uniview motion detection setup,
Uniview camera night vision guide,
Uniview camera video playback tutorial,
Uniview thermal camera installation,
Uniview smart event management guide,
How to use Uniview facial recognition,
Uniview cloud storage setup for cameras,
Uniview camera power supply options,
Uniview IPC3614 camera installation guide,
Uniview NVR302 setup instructions,
Uniview IPC322 setup and configuration,
Uniview PTZ dome camera user manual,
Uniview camera models comparison,
Uniview camera not working fix,
Uniview camera connection issues troubleshooting,
Uniview NVR not recording,
Uniview camera image quality problems,
How to reset Uniview camera to factory settings,
Best Uniview cameras for business security,
How to set up Uniview cameras for retail stores,
Uniview surveillance systems for warehouses,
Uniview cameras for smart home security,
Uniview cameras for outdoor monitoring,